@Component Decorator
This decorator marks a class as an Angular component and is used to provide metadata about the component. A component in Angular is independent and reusable. E.g.
@Component ({
	selector: 'app-root',
	templateUrl: './app.component.html' ,
	styleUrls: ['./app.component.css']
})
export class AppComponent {
	title = 'my first app';
}
Metadata may include things like
selector: Any element that matches this selector will be replaced with this component in the HTML templatetemplateUrl: The module-relative source of this components HTML template, however this template can be provided inline via thetemplateproperty instead.styleUrls: The module-relative source of the HTML template’s styling, however this styling can be provided inline via thestylesproperty instead.
Angular Template Logic & Data Flow
Template Statements (Side Effects)
In a template, we’d like to respond to an event like a button being clicked. In Angular, we use parenthesis (click) to denote an event and it must match a specific event name. Common DOM events are click, mouseenter, keydown, or custom events. There is always exactly one event.
<button (click)="logMessage('Hello', user.id, 42)">Click</button>Then we can call arbitrary code to produce an effect using quotes "func()". Usually this is just an event handler, but can be multiple statements or method calls.
Note: If you’d like to use the event object you must manually pass it into your handler using $event which is received by a method with a parameter of type Event.
<input (input)="onInputChange($event)" />Template Expressions (Pure/No side effects)
Used for displaying or passing data. For example:
<p>Hello, {{ firstName }}</p> // Direct value read
<h2>User: {{ getFullName() }}</h2> // Direct function call
<div>Total with Tax: {{ itemPrice * (1 + taxRate) }}</div>
<button [disabled]="itemPrice > 500">Buy Now</button>Rule: Template expressions must be idempotent—if an expression is called multiple times it should return the same value and not change the state of the app. Similar to React, Angular runs these expressions constantly to see if anything was changed so changing state would result in an infinite loop of updates.
Binding
Angular supports 1-Way Binding which uses template expressions to pull data from TypeScript and “read” it into HTML. Additionally, it supports 2-Way Binding which uses a template expression to read data, but also a template statement (behind the scenes) to write data back.
#### 1-Way B inding
A flow of data from Component Class → Template. There are two main ways:
- Interpolation
{{ }}: For rendering text.- Ex.
<h1>{{ title }}</h1>
- Ex.
- Property Binding
[]: For setting an element property, or custom prop.- Ex.
<button [disabled]="isInvalid">
- Ex.
2-Way Binding
A flow of data from Component Class ↔ Template. A common example is a textbox that you control rather than the DOM. 2-Way Binding allows you to display the value of the textbox and also set the value using the “banana in the box” [( )] syntax.
<input [(ngModel)]="username">
<p>Hello, {{ username }}!</p>
You will find later that this is syntactic sugar for both @Input and @Output working together.
Summary (Putting it all together)
Assuming we have the following component:
export class ProfileComponent {
  // Our "State"
  username: string = 'AngularLearner';
  bio: string = 'Learning bindings!';
  isPremium: boolean = false;
  profileColor: string = '#764abc';

  resetProfile() {
    this.username = '';
    this.bio = '';
    this.isPremium = false;
  }
}
We probably want “live-preview”—displaying readable profile data and styling the page based on profileColor and isPremium (for extra content). This is a textbook use-case for 1-Way Binding. We use both property binding to set element properties and string interpolation to display text:
<div [style.color]="profileColor">
  <h2>Preview: {{ username || 'Anonymous' }}</h2>
  <p>{{ bio }}</p>

  <span [hidden]="!isPremium">⭐ Premium Member</span>
</div>
We’d also like to support changing the profile through an editor of some kind. Here data flows two ways. If the user types, we should update the username variable—and when the username variable updates we should reflect that change to the user. This is a textbook example of 2-Way Binding. You may want to look at Attribute Directives to make more sense of this.
	<label>Username:</label>
	<input [(ngModel)]="username" placeholder="Type a username">

	<label>Bio:</label>
	<textarea [(ngModel)]="bio"></textarea>

	<label>
	  <input type="checkbox" [(ngModel)]="isPremium"> Premium Status
	</label>
Directives
Directives allow the use of logic to determine what is in the DOM. These traditionally are preceded with an asterisk * and looks like element properties but now use @ blocks in modern Angular (E.g. *ngIf vs. @ngIf).
Structural Directives
Used to add, delete, and modify DOM elements. Common directives include:
ngIfngForngRangengSwitch
The old way example:
<div *ngIf="isLoggedIn; else loggedOut">
  Welcome back, User!
</div>

<li *ngFor="let item of items; let i = index">
	{{ i }}: {{ item.name }}
</li>
The new way example:
@if (isLoggedIn) {
	<div>Welcome back, User!</div>
} @else {
	<div>Please sign in.</div>
}

@for (item of items; track item.id; let i = $index) {
	<li>{{ i }}: {{ item.name }}</li>
} @empty {
    <li>No items found!</li>
}
Attribute Directives
These change the appearance or behavior of existing elements dynamically. Examples include:
ngClass- `ngStyle
ngModel
Example:
<div [ngClass]="{ 'highlight': isSpecial, 'disabled': isDisabled }">
  Dynamic Styling
</div>
Pipes
Simply put, they allow for a quick transformation of data in a template. Some common examples include getting a currency representation from a number, representing a number as a percentage, getting the date, etc. It just requires following a variable with the pipe symbol | and the desired transformation name. E.g. {{textVar | lowercase}} and {{number | currency:"USD"}}.
Pipes are not limited to text transformations, but possibly things like objects to JSON and vice versa.
Custom Pipes
A custom pipe can be created via ng generate pipe <name> which creates a file where you must implement the transform function.
@NgModule Decorator
Any class marked with this decorator is an NgModule—this describes how to compile a component template and create an injector at runtime.
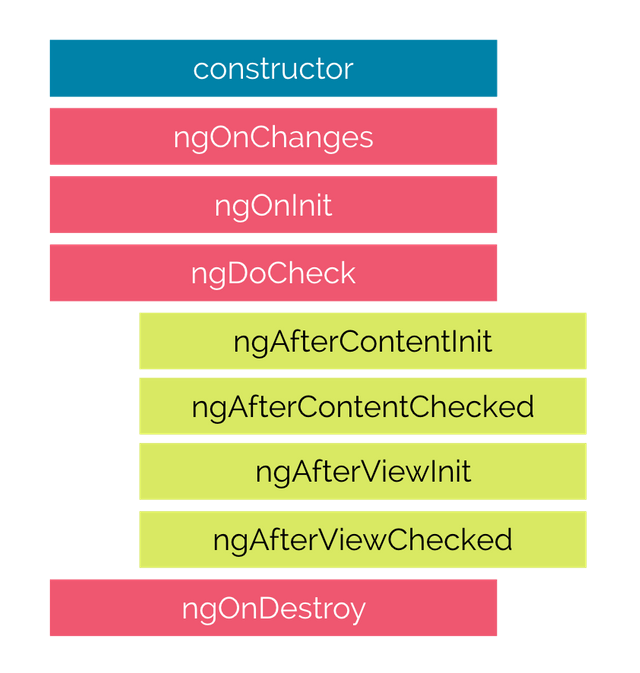
Component Lifecycle
In Angular, it’s fairly important to be aware of the component lifecycle since you’ll be explicitly hooking into it, e.g. initializing information when a component is created.
The Big Three (used 90% of the time)
ngOnInit(“Component Mounted”): Great for fetching data from an API or performing initialization logic.ngOnChanges(“Prop Changed”): A way to be notified when a component is changed, it triggers every time an@Input()property is modified. It returns aSimpleChangesobject containing the changes.ngOnDestroy(“The Cleanup”): Great for unsubscribing from observables, stopping timers, detaching event listeners, etc. Important to prevent memory leaks.
Note: Do not use
constructorto initialize a component, it is meant for dependency injection. When the component is actually “ready” we can move on to initialization viangOnInit.
Data Flow (Passing Data)
In frontend development, a core concept is passing data throughout the hierarchy between children and their parents. The idea to drill down is that Angular explicitly separates data coming in from events going out. This is in contrast to React for example where both are combined into one feature (i.e. props) which becomes abstracted.
Angular has two distinct decorators placed on the child which enforce this unidirectional flow.
@Input()
Great for injecting a value into a child.
// Child
@Input() user: any;

// Parent
<app-child [user]="currentUser"></app-child>
Remember that brackets
[]in Angular symbolize “value flowing in.”
@Output()
The child emits an event which the parent will be on the lookout for. It requires the creation of an EventEmitter which will hopefully be called by something in your child class.
An event can only be caught by a direct parent, not any further ancestors.
// Child
@Output() saved = new EventEmitter<string>();

doSomething() {
  this.saved.emit('Some Data'); // "Screaming" the data up to the parent
}

// Parent
<app-child (saved)="handleSomething($event)"></app-child>- Notice the
$eventobject. It will contain whatever was emitted, whether it be a string or an object if anything at all. - Notice the way the parent “sees” the child emitter via
saved.
Remember that parenthesis
()in Angular symbolize “event flowing out.”
Routing
Involves 3 main ideas + 1 for additional capabilities:
- Routes file containing an array of the possible routes.
- Router outlet which allows switching components in and out based on the route.
- Router navigation which uses
routerLinkinstead ofhreflike normal. - Route guards which determine and control whether a route can be navigated to or away from.
Routes Array
This is the heart of routing in Angular, usually in a file like app.routes.ts. Each object in the array tells angular “when the URL looks like X, show component Y.”
export const routes: Routes = [
  { path: 'home', component: HomeComponent },
  { path: 'profile', component: ProfileComponent },
  { path: '', redirectTo: '/home', pathMatch: 'full' }, // Default route
  { path: '**', component: PageNotFoundComponent }     // Wildcard (404)
];
While path and component are the most common fields, you might want to use redirectTo for redirection, children to define sub-routes, and especially route guards like canActivate to place constraints on navigation.
Router Outlet
This involves a specialized tag <router-outlet> which is placed in a template that allows switching out components in that slot based on the current route.
Router Navigation
Traditionally, you’d navigate to a page via <a href="/profile">. Don’t do this. This will unnecessarily reload the page, possibly losing any state. The intended way to navigate is by leveraging routerLink instead of href.
<a routerLink="/home">Go Home</a>Route Guards
Determine and control whether the user can navigate to or away from the given route based on some condition. It can be used to ask whether to save data before navigating away, fetch data before you display a view, confirm a navigation operation, or validate route parameters before navigating.
Types of route guards include:
CanActivate: Decides if a route can be activated based on the condition.CanDeactivate: Decides if a route can be left based on the condition.Resolve: Used to prefetch data before navigating the route.CanLoad: Decides if children can be loaded or not.CanActivateChild: Similar toCanActivatebut for a route child.
Services
A service is a TypeScript class used to share data or functionality throughout a program. By requesting the service in the constructor of a component, it uses dependency injection to go find the instance of the service. I.e. think of it like a global class or singleton since they always get the exact same instance.
When to use them: If multiple distant components need the data, a service is a great use case. E.g. a user profile, app settings, a checkout page. It can also be good if there’s complex logic that you’d like to keep out of your component files.
How to use them:
- Mark a class with
@Injectablerather than@Component, or create viang generate service <service>. - Set the
providedIn: rootproperty for your desired scope—this lets you decide where your singleton is accessible. - Once the service is implemented and you’d like to use it, inject it via the constructor into your desired component.
Service class
@Injectable({
  providedIn: 'root' // This makes it a singleton available everywhere
})
export class DataService {
  message: string = "Hello from the Service!";
}
Component class
@Component({
  selector: 'app-root',
  template: `<h1>{{ data.message }}</h1>`
})
export class AppComponent {
  // TypeScript shorthand: 'private' + type creates and assigns the property--don't worry about initializing it yourself
  constructor(private data: DataService) {
    // You can now access this.data.message anywhere in this class
  }
}
Observables
Angular regularly makes use of the Observer design pattern through “observables.” The pattern itself is fairly intuitive: there is a subject that has data, and there are observers which are listening for that data when it changes.
The observable implementation is powered by a library called RxJS (Reactive Extensions for JavaScript). To use them, you need to have an understanding of these four ideas:
- The “Stream” Metaphor: An observable is like a faucet that can be turned on (subscribed to) which allows data to flow over time.
- They are lazy. Nothing will happen unless you
subscribe()to an observable. - They are cancellable. Being subscribed to something when no one needs to do anything anymore is a classic “leak.”
- They are composable. You’ll see this with piping,
.map(),.filter(), etc. later.
HTTP Client
To interact with an API to fetch or upload data, we can leverage the HttpClient module. You might wonder why not just use fetch()? It boils down to several ideas which make it the goto option for Angular in particular.
fetch()returns a promise whereasHttpClientreturns observables. This allows for streaming data, canceling requests, retrying failed calls, etc.- Automatic JSON-parsing, no need to call
.json(). - Interceptors which allow things like attaching an Auth Token to every outgoing request.
- Pairs well with mocking frameworks in Angular, making testing and mocking backend responses much easier.
How do we use it?
First, understand that in Angular components are for UI logic and services are for data logic. That being said, that means we must strictly avoid putting HttpClient calls directly inside a component, but in a service instead.
We must first “provide” the client to enable it by using provideHttpClient(). Then in our service we can access the HttpClient singleton to make requests. Lastly, since it’s an observable we must subscribe to it otherwise the request will never fire.
// The service
@Injectable({ providedIn: 'root' })
export class UserService {
  constructor(private http: HttpClient) {}

  getUsers() {
    return this.http.get<User[]>('https://api.example.com/users');
  }
}

// The component
this.userService.getUsers().subscribe(data => { this.users = data; });